How to take Samsung screenshots? You recently bought a Samsung smartphone and tried to take a screenshot by pressing the buttons you used on your previous device, but it didn’t work? Well, most likely, the key combination you are using doesn’t work on your new device. Nothing broke; therefore, do not fear. Much more simply, the keys to press to take a screenshot can change from device to device. And obviously, the ones you are trying to use now are not good.
Given the situation. If you want, I can help you out. Would you please give me some of your attention? I can explain how to take Samsung screenshots: an effortless and feasible operation with integrated “standard” functions in Android and third-party apps.
Predefined functions for taking Samsung screenshots
As I told you at the beginning of the tutorial, all you have to do is use your smartphone’s default functions (or tablet) to take Samsung screenshots. Specifically, it is a question of using a unique combination of keys, gestures, or other parts to capture the screen.
But know that not everything visible on the display of the device can “photograph.” Some applications or screens, such as the lock or those related to security. It cannot capture as a matter of safety and privacy.
Also, consider that the information you find below may differ slightly from what you see on display. Depending on the exact model of the Samsung smartphone you are using, and the version of Android installed on it. Anyway, don’t worry: whether you want to know how to screenshot Samsung S20. How to screenshot Samsung A51 or screenshot on any other Samsung device, you will surely be able to “reconstruct” the exact procedures for your model.
Keys for taking Samsung screenshots
To begin with, I want to explain how to capture the screen on Samsung devices using the buttons on the latter.
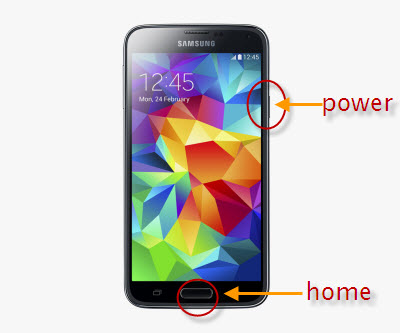
First, reach the screen you intend to “photograph,” then use the following key combination: power key + low volume key. If that doesn’t work, you can try this other key combination: Power key + Home key.
In case you do not know the power key. As the name suggests, the one used to turn on the device. And which uses to activate and deactivate the display: usually places on the right side. The low-volume key is the one you use to lower the volume of the smartphone: generally. It is located on the left side of the device downwards. Finally, the Home button is the central one located under the screen of older models. (which do not have the front part occupied only by the screen).
The keys must press simultaneously, and it necessary to continue holding the pressure for a few seconds until the smartphone display flashes. A sound similar to that of the beat of the old cameras is emitted (if the ringtone is enabled).
Once made, the screenshots are automatically saved. You can view them through the Gallery app, starting the latter, selecting the relative icon (the one with the flower ) that you find on the home screen and in the Android drawer by going to the Album section of the same and selecting the album called Screenshots.
Toolbar and Preview
Immediately after capturing each screen, Samsung smartphones show a special toolbar to share the captured image. And edit or delete it. So to edit a screenshot directly after capturing it. All you have to do is wait for its preview to appear at the top of the screen and press the buttons on the toolbar corresponding to the action you intend to take.
To be precise, by pressing the Draw button (the one with the pencil ), you can access the functions to draw and write on the screenshot using pens, pencils, highlighter, and brushes. And you can crop the screenshot; pressing the Crop button (the one with the cutter ), you can directly access the function to cut the screen; pressing the Share button (the one with the three dots connected ), you can quickly share the screenshot through other apps and services.
Notification Center
As an alternative to how I just indicated, or if you are using an older Samsung smartphone on which the screenshot preview and the toolbar are not shown, you can edit the screenshots created with your device by accessing the Android notification center with a swipe from top to bottom, by tapping on the notification relating to the screen just acquired and pressing the buttons to edit share or delete the “photograph” of the screen. Depending on the operations you intend to carry out.
Do you need to take a “long” screenshot, for example, of a web page in its entirety? In that case, instead of taking multiple screenshots. As I indicate, you can take a screenshot. While scrolling and get a single extended photo. To do this, use the Smart Acquisition function by tapping on the relative icon (the one with the double arrow inside the square with the corners highlighted ) that you find on the toolbar that you see appear immediately after capturing a screenshot.
Note that the Smart Capture command only shows if the screen shows a long scrolling screen. Furthermore, to use it. The relative option must enable in the Android settings. To do this, select the Settings icon (the one in the shape of a gear wheel ) that you find on the home screen and in the drawer, touch the word Advanced functions on the next screen, and check that the switch next to the Intelligent acquisition item is set to ON (otherwise you can do it yourself).

Gestures to take s.s on Samsung
You can also take screenshots on Samsung using certain gestures, thus avoiding using the key combination. You ask me how to do it? I’ll explain it to you right away!
In this case, you can take your screenshots simply by reaching the screen you want to “photograph” and sliding the edge of the hand on the screen dragging the side of the palm over half of the screen, and always maintaining contact with it. Easier than that?
After the acquisition, even in this case the smartphone display flashes, a sound similar to that of the second of the old cameras is emitted (if the ringtone is enabled), and the image is saved in the Android Gallery and possibly can modify using the options attached to the toolbar that appears later.
However, it should bear in mind that not all Samsung smartphone models allow you to do this. And that before you can use the feature above. You must make sure that it enables in the device settings. To do this, select the Settings icon (the one in the shape of a gear wheel ) that you find on the home screen or in the drawer, tap on the Advanced functions item on the next screen and check that the switch next to the Acquire item with palm drag is set to ON (otherwise you can do it yourself).
Also read: what colors make red.


